Monday, 29 February 2016

Hair Practice


Hair Practice for Jeykll and Hyde.


Consultation notes:
Name: Ross Kershaw
Age:22
Skin type: dry
Hair type: Grey/pink, short
Skin tone: Pale
Eye colour: blue
Eyeshape: Even
Allergies/medication: N/A
Contraindications: N/A
Notes: Use heat spray onto the hair as it gets bleached a lot.

Tools used:
Kryolan color spray brown, grey and black

Notes: spray at a far distance, cover the skin to make sure you don't spray the colour onto the skin.

I have sprayed the grey and brown to see what they looked like together, I didn't really like the outcome of the brown colour.


I have sprayed over the brown with the black and think it looks a lot better for this character, as the character is meant to have a sinister look and believe the black would help create this effect.


This color spray is amazing I like how it looks with and without the flash. I am thinking a side part, one side it grey and slick back and the other side is messy and curly this will be the black side. I will have to style the hair first before using the spray.

Saturday, 27 February 2016

Dirty teeth makeup


Dirty Teeth Make-up

Consultation notes:
Name: Ross Kershaw
Age:22
Skin type: dry
Hair type: Grey, short
Skin tone: Pale
Eye colour: blue
Eyeshape: Even
Allergies/medication: N/A
Contraindications: N/A
Notes: Don't use the product if the teeth have been recently bleached or have and fillings on.

Tools used.
Cotton buds
Kryolan tooth enamel (black & nicotine colours)
Surgical spirit 


Dirty teeth

I have only used the colouring on the top front two teeth.
Step 1. Dry the teeth with a cotton wool bud
Step 2. Apply the nicotine colour to the teeth all over
Step 3. Apply the black colour onto the bottom of the teeth

To remove use surgical spirit/alcohol on the teeth and with a cotton wool bud.


With the time I had it was a bit rushed, next time I would do most of the teeth and not leave white gaps, this is what I can improve on for next time. I need to do some research on rotting teeth and use the images from that to create a better looking image for rotting teeth, but today was more of a try of using the product as it was my first time.


Friday, 26 February 2016

Dirt Makeup

 Dirt Make-up


Consultation notes:
Name: Ross Kershaw
Age:22
Skin type: dry
Hair type: Grey, short
Skin tone: Pale
Eye colour: blue
Eyeshape: Even
Allergies/medication: N/A
Contraindications: N/A
Notes: Can use fullers earth in hair and on skin.

Tools used:
cotton buds
Fullers earth
Kryolan color spray (dirty grey & black)
hairdryer


Dust

This is fuller's earth straight from the pot, this creates the dust/dirty powdery texture.
Step 1. Take a nice amount of fullers earth and place it where you would like the products
Simple.


Dirt/Cracks

Mixing fullers earth with water.
Step 1. Mix fullers earth with water in a clean tub until it turns to a thick paste
Step 2. Apply the the paste where you would like the cracks/dirt
3. Dry with a warm hair dryer
4. Wait until it all turns into a light grey colour


Applying Colour
Using Kryolan color spray in dirty grey and black (shake well before use)
Step 1. After the product is dry use the dirty grey spray all over the hand/product
Step 2. Apply the black onto the fingers and fade out by holding the spray further back


The effect of the spray onto the fullers earth gives it a really different look and adds more to it that just using the fullers earth on its own. The hand now looks like a zombie hand reaching out from a grave. The product reminds me of a face mask and the way it cracks when its dry, I love the effect and really proud of how it has turned out. I would work harder on creating a dusty face but as I only had a short time I just applied a small amount.


Wednesday, 24 February 2016

Scars (Rigid collodion)

Rigid Collodion-Mouth Scar


Consultation notes:
Name: Lauren Armstrong (me)
Age:21
Skin type: dry
Hair type: Long Brown
Skin tone: Pale
Eye colour: green
Eyeshape: Even
Allergies/medication: N/A
Contraindications: N/A
Notes: do not apply too close to eyelids, or use for multiple days in a row.

Tools:
Natural pink tone lip pencil (Illamasqua woo)
Rigid collodion


Step 1: Apply the lip pencil to the face where you want the scar to be.
Step 2: Apply the rigid collodion onto the lip pencilled line, apply a few coats of the product and wait for it to dry.


This is an amazing effect for creating realistic scars, I love this product and would definitely recommend it to anyone who wanted to create a scar. Its easy and quick to use. I feel this would be good for film/ tv as it looks so realistic and think it would look good on camera.


Tyrion Lannister- Game of Thrones

On screen the character Tryrion was hurt in battle and now has a scar down his face, rigid collodion would be good for creating older/healed scars to the face as seen in the picture below.


[1]


I have found a clip from the TV Series that shows Tyrion's scar more clear.


References
[1] Game of Thrones, 2015. Tyrion Lannister scar [digital image] [02/03/16]. Available from:http://38.media.tumblr.com/814ace2f1ae85f7f7216bfa893a98c3f/tumblr_inline_mkbt01poqZ1qz4rgp.jpg
[2] Game of Thrones, 2014 [medium]. HBOl. 
[3] Devent. 2014, Game of Thrones- Epic Tyrion speech during trial [02/03/15] Avaliable from: https://www.youtube.com/watch?v=e4Uq8O5ZhUA


Tuesday, 23 February 2016

Jekyll and Hyde ITV UF


Jekyll and Hyde (ITV)

So as I have been researching about my book I stumble across this gem, an actual series which is based on Jekyll and Hyde. It is set more into the future from the 18th century, in the 1930's London. It based on the original Jekyll and Hyde's grandson who has inherited the split personality trait. It shows other monsters and strange characters and involves Dr Robert Jekyll and Mr Hyde the hero stopping the monsters from terrorising London and his quest to discover his own real identity and cure the curse of his family.

I watched the whole first season and really got into it, was really interesting seeing the styles of 1930's the make-up/hair styles and the outfits. I enjoyed how Jekyll transforms into his other half with veins all round his eyes, clear glossy eye contacts, crooked teeth and messed up hair.

Unfortunately their isn't going to be another series as it was discontinued as their wasn't enough viewers watching but it has really helped with learning more about Jekyll and Hyde.

Monday, 22 February 2016

Jekyll and hyde make-up ideas and face charts

Jeykll and Hyde Make-up design

The Character I had chosen to do was both Jekyll and Hyde and decided to half and half the make-up, one side will be Jekyll and the other Hyde. In the book Jeykll is an aged man, so I have decided to do the make-up with wrinkles and grey bushy eyebrows. Hyde is known as odd looking/ deformed, so I have decided to make his face look rough with deep cheek bones, heavy bags under eyes, bushy black eyebrows, white skin and red blood shot eyes.

I am really happy with my design but I am not sure whether to use latex for the wrinkles or just use eye shadow and create the lines. Latex is unpredictable at times and I don't want to mess my continuity assessment up, so I am more towards using the eye shadow, but it is something I need to test out.

Sunday, 21 February 2016

Jekyll and hyde hair chart/ideas

Jeykll and Hyde Hair Charts

I have created this face chart with Victorian influences, looking at Victorian men's hairstyle  I have decided to go with a side parting. As my design is half and half, one side which is the small side of the parting will be slick back and grey as Jekyll is an old man. On the other I see some of the Victorian men have slightly curled hair and as my other character Hyde is know as deformed and abnormal I will over curl his hair and back comb it looking crazy and have it black. 


[1]


I really like my idea and think it is suitable for the character, I have enjoyed doing half and half design and was unsure whether I would come up with a good design, I even thought of using a top hat but I wanted to design more of the hair and not cover most of it with a hat. 


References:
Anon, n.d. Victorian Men's Hair styles [digital image] [21/02/2016]. Available from: http://thevintagethimble.tumblr.com/post/49577290972/victorian-mens-hairstyles-facial-hair-a

Saturday, 20 February 2016

Black Eye make-up Practice

Black Eye Make-up Practice

Tools:
Moisturiser
Small brush
Kryolan Supacolor (red, purple,yellow)
or Bruise wheel kryolan


Consultation

Name: Billie Eva Jolly
Age:22
Hair type: Dyed Pink
Skin type: Dry
Skin tone:Pale complexion
Eye colour: Blue
Allergies: None
Contraindication: None
Notes: Make sure the model isn't allergic to the products, moisturise the skin well.

Step by step

1. Moisturise around the eye and onto the lids
2.Make sure you know which stages of the black eye you are doing and then pick the colours
3. With a small brush go to the inner part of the crease and place a mixture of purple and red with circular motions.
4.If any harsh edges bland them away with your finger
5. Use the same colour and brush and take the colour down to the eye socket and round 
6. blend out any edges
7. Use the yellow colour on the outer part of the eye and blend down and round
8. keep this more faded and blended.


Friday, 19 February 2016

Fever, Sweat and Tears Practice

Fever, Sweat and Tears Practice

Tools:
Moisturiser
Kryolan Supacolor
Black stipple sponge
Small eye brush
Glycerine
Eye drops
Latex
Big wall paint brush (Splatter brush)

Consultation:

Name: Billie Eva Jolly
Age:22
Hair type: Dyed Pink
Skin type: Dry
Skin tone:Pale complexion
Eye colour: Blue
Allergies: None
Contraindication: None
Notes: Make sure the model isn't allergic to the products, moisturise the skin well.

Step by step

Creating the Blotches

1. Moisturise the skin 
2. Check for any blemishes and cover up
3. Mix the red supacolor with ISO alcohol
4. Use the black stipple sponge and dab the supacolor on
5.Use finger to blend out and help blend out and straight edges
6. Make sure to go down the neck, over the ear and into the hair line
7. Mix the supacolor with moisturiser this time and use the small eye brush to apply it onto the eyes.
8. Look from different angles to check the make-up it looking real and correct any errors
9. Get the splatter brush and use the red supacolor and ISO alcohol mixed product and splatter over the face.
10.Use a bluey/red tone and use that to splatter onto the face.


Dried Lips

1. Made the model pucker and open their lips slightly 
2. Dab over the lips with latex with your finger
3. Wait for the latex to dry clear
4. Apply red paint over the cracked lips to give it more of a realistic look


Sweat
1. Using the black stipple sponge and dab the Glycerine over where you want the sweat
2.Spray hair wet and back of neck


Tears
1.Using eye drops and drop them into the eye
2. Use glycerine under the eye and create a  tear drop down the eyes (DON'T GET GLYCERINE INTO THE EYE)


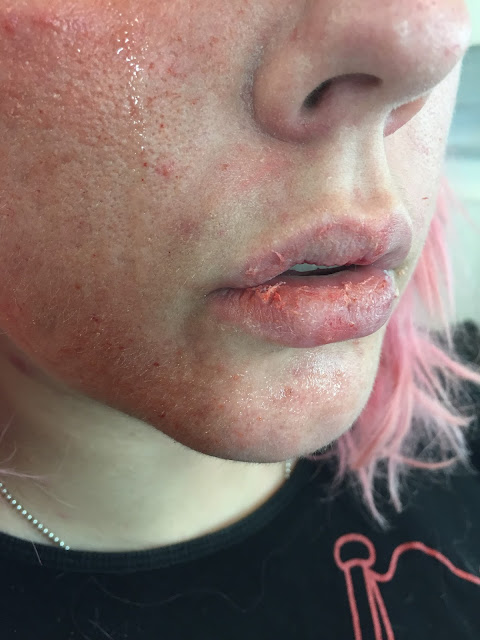
Creating this fever look was something different to me as I am normally creating a beauty or a nice clean make-up, so doing this was so different and I really enjoyed it making someone look sick and feverish. Creating the tears was something I really liked as well, as they looked realistic. For things I would improve on would be blending the blotches more and blending them down the neck and into the hair line. I have also never used glycerine before and I really liked the realistic look it gave off.

Tuesday, 16 February 2016

Black eye

Black Eye

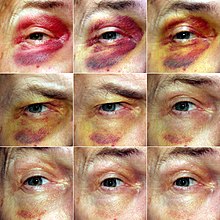
There are different stages of a black eye the first initial look to it is more deep purples and reds, then the reds and purples fade a bit and then yellow colours appear. 

Black eyes always tend to look glossy so always moisturise the area and use Vaseline to add extra glossy shine to it.

Always think of where the victim has been hit or fallen on that part of the eye as it would create different patterns, where the place that has been hit is the one with the most deeper colour to it and then the other colours bruise around it.

[1]
References: ANON, nd. process of black eye [digital image] [16/02/16]. Available from: https://en.wikipedia.org/wiki/Black_eye

Monday, 15 February 2016

High Definition Broadcasting

High Definition Broadcasting

High Definition Broadcasting (HDTV) is a better quality picture when watching TV, it shows more detail and more of a realistic picture. This would effect make-up artists and hair stylists as it would be a lot of pressure of getting the make-up and hair perfect for on screen, their can't be any flaws in the make-up or any hair out of place. As HD is a very vivid picture the viewers would see very clearly if there are any mistakes that have happened, this could effect and ruin the viewers take on the film, episode or TV program which would effect the job and potential future jobs with the TV/Film company you are working with as they would want everything to be perfect and in good detail. 

Saturday, 13 February 2016

Victorian Hair Research

Victorian Hair Research

Over the Victorian period the hair had changed some styles but not that dramatically, 

WOMEN

1820-30's
Princess Victoria, Duchess of Kent and Strathearn, by Thomas Woolnoth, after  George Dawe, published 1820 - NPG D10830 - © National Portrait Gallery, London
[1]

Tight ringlets on either sides of the face with a centre parting. An Apollo knot bun (bow-like) or a bun at the back made out of a plat. The tight curls would also be curled towards the face.

1830's

The ringlets are softer on either side with a centre parting still. Bonnets where popular in this era and the bun moved further down in the hair which helped fit into the shaping of the bonnet.


1835

Plats/twists on either sides of the hair drooped down and round under the ears, a bun which was made with a plat.

1840's
The curls where more flattering, lower and softer curls. Hard centre parting was now softer and not a prominent, bun was lower at the back and the curls became longer.

To create these looks they used iron tongs that they would place onto the stove/fire to heat up and use onto the hair to create the curls.

MEN

Early Victorian era:
Side parting where popular, curled hair that styled around the hat as they would wear hats on a daily basis. Facial hair, moustaches, big chops and beard where also popular.

 References:

Helen Keelan, 2016. Victorian Hair Styles. Lecture delivered to [Make-up and Hair Design, level 4], 03/02/16


[1] Thomas Woolnoth,1820.Princess Victoria, Duchess of Kent and Strathearn[digital image] [10/02/16]. Available from: http://www.npg.org.uk/collections/search/portrait/mw17825/Princess-Victoria-Duchess-of-Kent-and-Strathearn

Friday, 12 February 2016

Victorian Hair Practice

Victorian Hair Practice

Tools:
Sectioning comb
Sectioning clips
Hair bobble/band
Hair grips/pins


Step by Step

1. Start by sectioning ear to ear creating a front and back section of the hair, pin the front section away.
2.Put the back section in a pony in the middle of the hair
3.French plat the pony and twist round into a bun and pin it so its secure
4.Start on the front section of the hair and do a centre parting
5. Choose one side of the parting and grab it loosely, stand in front of the model and start the French plat the hair loosely but pulling the hair to the front of the models face as you plat.
6. After you have done the plat loop it under the ear and pin the bottom of the plat into the bun at the back, making sure its secure.
7. Repeat this process on the other side of the parting.


I enjoyed learning different hair styles in the Victorian era and think its interesting what the trends where. I think I done quite well with my first practice but I wasn't quite happy with the loose plat at the sides of the ears, I will try better next time as I don't think you can see the plat properly and look more like twists so I could improve on that next time. Despite the improvements I could make, I am really proud of how well it looks and how very Victorian it turned out.

Thursday, 11 February 2016

Burns

Burns


Real Burn Images


1st degree burn
Sun burn: harder edges, colour difference where the sun hit, red of where the sun has been hitting the skin all day and normal pale skin where the skin has been covered from the sun.
[1]

2nd degree burn and healing process
The second degree burn has a lot of different reds, pinks, orange and yellowish tones to it, the lines are blended and not straight or harsh edges. The process of the healing it turns to a more pinky tone and then starts to show a cracked dry skin look to it,

[2]
3rd degree burn
This third degree burn is pinky and yellowy colours with bits of black, I think as this burn was a different way of being burnt possibly from a fire or a acid caused burn. The edges are blended and smooth.

[3]


4th degree burn
The 4th degree burn is glossy and pussy yellow colour, with reds pinks and a few black tones. This also has no harsh edges its smooth blended edges.
[4]
When re-creating burns you need to think of what the background story of the burn is, for example either its a hot water burn, sun burn or even acid. You need to make sure your creating the right burn for the different causes as they are not all the same.


References:
[1] Anon, n.d. sunburn [digital image] [10/02/16]. Available from: http://i3.walesonline.co.uk/incoming/article1790567.ece/alternates/s2197/KirstyMcRaeBurns152868834.jpg
[2] anon. n.d. coffee burn [digital image] [10/02/16] Available from: https://www.flickr.com/photos/10025736@N06/2951580847
[3]anon.n.d. third degree burn [digital image] [10/02/16] Avaliable from: https://www.boundless.com/physiology/textbooks/boundless-anatomy-and-physiology-textbook/the-integumentary-system-5/skin-diseases-disorders-injury-and-clinical-cases-69/burns-412-1193/
[4]anon.n.d. fourth degree burn [digital image] [10/02/16] Avaliable from: https://www.boundless.com/physiology/textbooks/boundless-anatomy-and-physiology-textbook/the-integumentary-system-5/skin-diseases-disorders-injury-and-clinical-cases-69/burns-412-1193/


Wednesday, 10 February 2016

Burn Practice

Burns

Tools:
Gelatine nuggets (clear)
Metal spatula
Kryolan powder
Kryolan Super colour palette
Powder puff
Powder make up brush
Fake blood
Witch hazel
Fake pus
Microwave
Cape to cover model
Notes: use witch hazel and cotton buds to blend edges, warm water to remove the gelatine, Once melted you can use super colour or aqua colour to add different colours.


Consultation

Name: Sian Harding-Morris
Age:18
Hair type: Dyed
Skin type: Normal
Skin tone: Olive/slight tan
Eye colour: Hazel
Allergies: None
Contraindication: None
Notes: Make sure the model isn't allergic to the product and check the Gelatine isn't too hot for the model skin. 

Step by step 

1, Microwave the gelatine until melted
2. Check the head of gelatin onto your hand before putting on the model
3. Apply gelatine with metal spatula
4.Create different textures using the spatula
5. Blend edges outwards, use cotton buds with witch hazel to help blend them out
6. Dry with a cool hair dryer heat
7. Powder over with a powder puff
8.Stipple some colour over with a powder brush
9.  Can add pus underneath with pin/clip
10.Use small brush to apply more depth and colour into the burn
11.Rub blood over with finger
11.Add Vaseline to make the burn look glossy


BEFORE COLOURED

WITH FLASH


NO FLASH


This was my first time using Gelatine and I wasn't sure if I liked this technique creating the burn as you have to wait for the gelatine to cool before use but then you have to hurry before it starts to clump together, so it is quite hard to use and get the shape you want. With more practice I am sure I could make it a lot better, I am a perfectionist and really like the make-up to look perfect but I believe if I research which burn I am going to do first then apply t after practices I will be more happy with the outcome. I could do better with getting a better spatula to apply the gelatine and I need to practice blending the product out as this outcome had hard edges.

Saturday, 6 February 2016

Creating a cut

Creating a cut

Products used:
Moulding Wax/Silly Wax
Latex
Sculpting tools
Black stipple sponge
Kryolan super colour
Kryolan bruise wheel
Fake blood
Kryolan protector
Wound filler
Moisturiser
IPA Liquid


Name: Sian Harding-Morris
Age:18
Hair type: Dyed
Skin type: Normal
Skin tone: Olive/slight tan
Eye colour: Hazel
Allergies: None
Contraindication: None
Notes: Doing cut on arm, make sure you use Kryolan protector before using any of these products.

Step 1:
Make sure the area you are creating the cut on is clear of all products and use Kryolan protector
Step 2:
Soften the wax on the back of your hand, smooth down the wax on the area you are creating the cut, use moisturiser to smooth down any edges
Step 3:
Create a cut down the middle of the wax
Step 4:
Apply a thin layer of latex over the wax and blend outwards, then cool dry with the hair dryer
Step 5: 
Use acetone to blend down any broken edges
Step 6:
Apply foundation mixed with IPA liquid  make sure the colour matches the skin and with a dabbing action apply it over the wound with a flat brush


Step 7:
Use black Kryolan super colour into the deep of the wound and then apply wound filler
Step 8:
Apply red and dark red with stipple sponge over the wound
Step 9:
Apply fake blood into the wound and spread it out with the stipple sponge


This is my end results, I am happy with the outcome but with the short amount of time I had I know I could do better and I will do next time, I have created wounds and cuts before but I have never used the latex over the wound and I feel the way I applied it, it cracked and made it look like dry skin, so I have covered the cracks with the stippling red paint and blood so it is less noticeable. I don't think it looks that real but with practice I know I can create a realistic one. 
I have really enjoyed creating this and know that I want to pick Special Effects next year as I want to work behind film and Tv doing some sort of special effects.